
Important Facts You Need To Know About Your Camera’s ISO
Photo Print Pictures July 23, 2015 Editorial Staff 0

Did you recently purchase a high-end camera that you don’t really know how to use? After speaking with the guy at CVS Photo were you still confused? Did you look at the buttons and just don’t understand any of them? If yes, then there’s no need to worry because one of the most important features of your camera, which is the ISO will be explained here.
What is ISO?
The ISO setting found in cameras is responsible for controlling how sensitive your camera is to light. More specifically, the ISO affects the exposure of photos in such a way that it helps determine whether a single photograph looks too bright, too dark, or just normal.
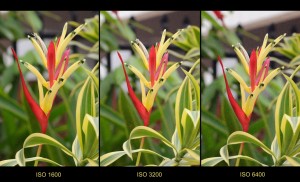
Additionally, the ISO also impacts the photo’s noise. As it is, photos don’t have any sound but the ISO helps determine its texture. A photo may look a little too grainy compared to other images because of the ISO level you chose when taking the photograph.
How to Take Amazing Photos Using ISO?
There are two simple rules to adjusting and using the right ISO levels when taking photographs. When taking photos outdoors and in broad daylight, always use low ISO setting. When taking photos while indoors and during night time, always make it a point to use higher ISO settings.
Tips on How to Adjust ISO Settings
1. Use Low ISO Settings
Adjusting your ISO setting should not be a difficult task. All you have to remember is to start with the basics. First, use the lowest ISO setting that you can find in your camera. Especially for beginners, this technique truly works because the quality of the picture always looks nicer when you use low ISO settings.
2. Increase ISO Settings
After you’ve familiarized yourself with how you use your camera, it’s now time to know how to adjust and use higher ISO settings. Take note though that the higher the ISO setting is, the more likely will your photos look grainy. Additionally, higher ISO settings also wash out the colors of your photos.
Why Increase ISO Settings 
A lot of people tend to wonder why they need to increase their ISO settings when doing so can only make their photos look grainy or noisy. However, increasing ISO settings also have its own fair share of benefits.
When you increase your ISO settings, it is less likely for your photos to look blurry. Increasing your ISO settings make it more sensitive to light. With this, more light will get into your pictures so it becomes faster to snap images.
Should You Adjust ISO Settings Manually?
For beginners, using the ISO settings based on pre-programmed numbers may be the best option. However, at some point, it will also be a must for you to learn how to manually adjust the ISO settings of your camera.
Learning how to manually adjust ISO settings also means that you will have more creative control over the pictures that you will take.
After you’ve learned the basics you need to know about ISO settings, it’s now time to print out the pictures at Walgreens. The photo printing services there remain to be as one of the best you can find across the globe!

No comments so far.
Be first to leave comment below.